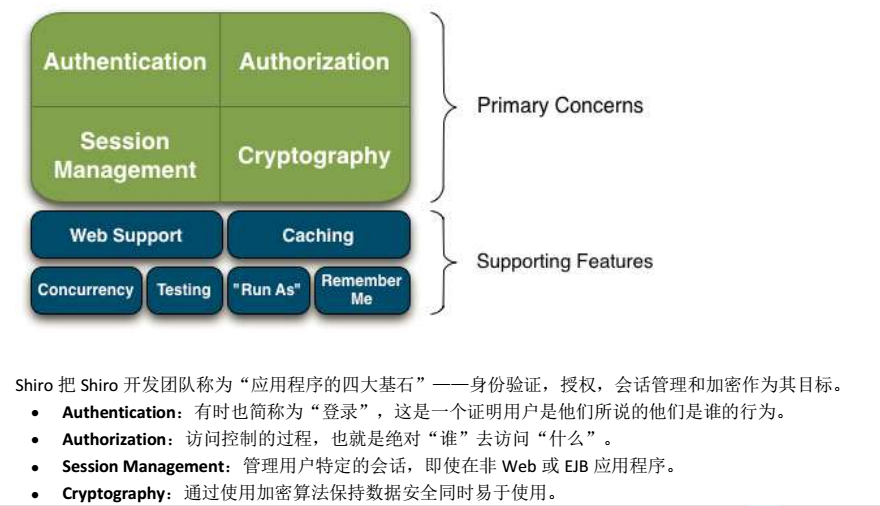
基本概念
一般涉及到用户参与的系统,都会涉及权限管理,权限管理属于系统安全的问题,实现对用户访问的控制,限制用户的访问。
入门
一句话:Apache Shiro 是Java语言开发的一个安全框架。
学习Shiro首要了解他的核心结构
SecurityManager为核心认证/权限管理
在java中初步使用Shiro
创建一个quickstart的maven项目 引入依赖1
2
3
4
5<dependency>
<groupId>org.apache.shiro</groupId>
<artifactId>shiro-core</artifactId>
<version>1.2.3</version>
</dependency>
创建一个ini配置来模拟用户数据
shiro.ini1
2
3[users]
#模拟用户 username=password
pace2car=123456
创建测试类1
2
3
4
5
6
7
8
9
10
11
12
13
14
15
16
17
18
19
20
21
22
23
24
25
26
27
28public class ShiroTest {
private final static Log logger = LogFactory.getLog(ShiroTest.class);
public void testLogin() {
//加载配置 创建工厂
Factory<SecurityManager> factory = new IniSecurityManagerFactory("classpath:shiro.ini");
//创建实例
SecurityManager securityManager = factory.getInstance();
//绑定到运行环境中
SecurityUtils.setSecurityManager(securityManager);
//创建登录主体
Subject subject = SecurityUtils.getSubject();
//绑定主体的身份和凭证
UsernamePasswordToken token = new UsernamePasswordToken("pace2car", "123456");
//主体登录
subject.login(token);
//验证登录
logger.info("用户登录状态:" + subject.isAuthenticated());//true
//登出
subject.logout();
logger.info("用户登录状态:" + subject.isAuthenticated());//false
}
}

一般情况下,认证失败会有一下两种异常:
用户名不存在异常
1
UnknownAccountException
密码错误异常
1
IncorrectCredentialsException
我们可以catch这两种异常的来做出响应
自定义Realm
根据上面提到的demo,通过对其登录操作的流程分析,不难发现仍有许多的遗留问题
通过自定义Realm,重写其中的方法,使其更能适应实际需求
一般来说我们继承AuthorizingRealm类(通过Realm的继承树可以看出,这个类包含类基本的认证和授权),并重写其中的方法
1 | public class MyRealm extends AuthorizingRealm { |
MD5密码加密
1 | public class MD5Test { |
当然对应的Realm也要加上对应的加密方式1
2
3
4
5
6
7
8
9
10
11
12
13
14
15
16
17
18
19
20
21
22
23
24
25
26/**
* 认证
* @param token 登录信息包装成的信息
* @return
* @throws AuthenticationException
*/
protected AuthenticationInfo doGetAuthenticationInfo(AuthenticationToken token) throws AuthenticationException {
System.out.println(token);
//获取登录的用户名
String username = (String) token.getPrincipal();
//通过用户名到数据库中去查,返回User对象方便比较
//假设已返回数据
if (!"pace2car".equals(username)) {
return null;
}
//模拟数据库中的加密密码
String password = "d2a56c32e5dd87139871d44f99e87a33";
//info对象表示realm登录比对信息+第三个参数为盐
SimpleAuthenticationInfo info = new SimpleAuthenticationInfo(username, password, ByteSource.Util.bytes("chenjiahao"), getName());
return info;
}
权限管理
在解决登录及加密问题后,就是权限问题了
shiro的权限控制类似于RBAC模型,建议先补充一下预备知识
同样先以ini的方式模拟数据库1
2
3
4
5
6
7
8
9
10
11[users]
#模拟用户
pace2car=123456,role1,role2
[roles]
#角色role1对user资源拥有create、update权限
role1=user:create,user:update
#角色role2对user资源拥有create、delete权限
role2=user:create,user:delete
#角色role3对user资源拥有select权限
role3=user:select
测试权限1
2
3
4
5
6
7
8
9
10
11
12
13
14
15
16
17
18
19
20
21
22
23
24
25
26
27
28
29
30
public void testHasRole() {
Factory<SecurityManager> factory = new IniSecurityManagerFactory("classpath:shiro-permission.ini");
SecurityManager securityManager = factory.getInstance();
SecurityUtils.setSecurityManager(securityManager);
Subject subject = SecurityUtils.getSubject();
UsernamePasswordToken token = new UsernamePasswordToken("pace2car", "123456");
subject.login(token);
//用户已登录,这是进行授权的基础
//对角色的检查
//有返回值的检查
logger.info(subject.hasRole("role1"));
logger.info(subject.hasAllRoles(Arrays.asList("role1", "role2")));
logger.info(Arrays.toString(subject.hasRoles(Arrays.asList("role1", "role2", "role3"))));
//无返回值的检查
subject.checkRole("role1");//继续执行
subject.checkRole("role3");//报错
//对权限的检查
//有返回值的检查
logger.info(subject.isPermitted("user:create"));
logger.info(subject.isPermittedAll("user:create", "user:delete"));
logger.info(Arrays.toString(subject.isPermitted("user:select", "user:delete")));
//无返回值的检查
subject.checkPermission("user:create");//继续执行
subject.checkPermission("user:select");//报错
}
自定义Realm检查权限
1 | /** |
测试代码1
2
3
4
5
6
7
8
9
10
11
12
13
14
15
public void testHasRoleByRealm() {
Factory<SecurityManager> factory = new IniSecurityManagerFactory("classpath:shiro-permission-realm.ini");
SecurityManager securityManager = factory.getInstance();
SecurityUtils.setSecurityManager(securityManager);
Subject subject = SecurityUtils.getSubject();
UsernamePasswordToken token = new UsernamePasswordToken("chenjiahao", "123456");
subject.login(token);
//用户已登录,这是进行授权的基础
logger.info(subject.hasRole("role1"));
logger.info(subject.isPermitted("user:create"));
}
认识shiroFilter
shiro提供类似mvc框架前端请求分发器的Filter,在应用中将这个过滤器配置在分发器之前便可启用shiro的功能
shiro的主要过滤器主要有:
执行流程及优先级:
通过jsp标签的权限控制

Spring整合Shiro
引入依赖
准备好一个SSM Web项目
添加以下依赖1
2
3
4
5
6
7
8
9
10
11
12
13
14
15
16
17
18
19
20
21
22
23
24
25
26
27
28
29
30
31
32
33
34
35
36
37
38
39
40
41<!-- shiro -->
<dependency>
<groupId>commons-logging</groupId>
<artifactId>commons-logging</artifactId>
<version>1.2</version>
</dependency>
<dependency>
<groupId>commons-collections</groupId>
<artifactId>commons-collections</artifactId>
<version>3.2.2</version>
</dependency>
<dependency>
<groupId>org.apache.shiro</groupId>
<artifactId>shiro-core</artifactId>
<version>${shiro.version}</version>
</dependency>
<dependency>
<groupId>org.apache.shiro</groupId>
<artifactId>shiro-web</artifactId>
<version>${shiro.version}</version>
</dependency>
<dependency>
<groupId>net.sf.ehcache</groupId>
<artifactId>ehcache-core</artifactId>
<version>2.6.11</version>
</dependency>
<dependency>
<groupId>org.apache.shiro</groupId>
<artifactId>shiro-ehcache</artifactId>
<version>${shiro.version}</version>
</dependency>
<dependency>
<groupId>org.apache.shiro</groupId>
<artifactId>shiro-quartz</artifactId>
<version>${shiro.version}</version>
</dependency>
<dependency>
<groupId>org.apache.shiro</groupId>
<artifactId>shiro-spring</artifactId>
<version>${shiro.version}</version>
</dependency>
然后引入shiro配置
首先是在web.xml中配置shiroFilter1
2
3
4
5
6
7
8<filter>
<filter-name>shiroFilter</filter-name>
<filter-class>org.springframework.web.filter.DelegatingFilterProxy</filter-class>
</filter>
<filter-mapping>
<filter-name>shiroFilter</filter-name>
<url-pattern>/*</url-pattern>
</filter-mapping>
然后新建一个spring-shiro.xml配置
1 | <?xml version="1.0" encoding="UTF-8"?> |
在spring上下文中引用
1 | <import resource="spring-shiro.xml"/> |
启动项目测试访问非登录操作,如果自动跳回配置的登录页面即成功
当然shiro的功能远不止此,更多的学习还是以官方文档为准
参考项目:
